Search Knowledge Base by Keyword
Getting Started
The building module inside of EdgeWise offers a fully automated algorithm that performs automatic wall extraction. This guide will cover how to use the Revit Plugin Tools for the EdgeWise building module.
The EdgeWise plugin within Revit gives you additional functionality to further adjust your wall models as well as adding point database information. Ensure you already have your wall model imported into Revit to begin. Refer to the Exports and Revit Importer articles for information on how to get your EdgeWise model into Revit.
Revit Plugin Tools
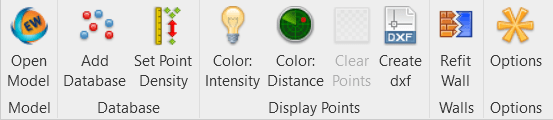
The Add Database tool allows you to bring in QA points that provide access to the Revit Plugin Tools. First, click Add Database and select the exact same .c3rvt file you selected to import your model. You will be given a Database successfully linked popup once completed.
Select a wall, and then click Color: Distance and you’ll be given a pseudo heat-map. This heat-map shows the difference between the current wall object and the as-built condition from the points. If you wish to adjust the wall, click Refit Wall. Original Wall will revert the wall to its condition upon import. Best-fit, plumb Wall will adjust the wall to the point cloud but keep the wall vertical. Lastly, As-built Face-Wall will create a mesh and adjust the wall to an as-built condition.
Using the Add Database tool only allows the points to be viewed one wall at a time.
Smart Points Import
If you wish to bring in the Smart Points from EdgeWise, navigate to the Insert tab and click Point Cloud. Then select your .RCP file you exported from EdgeWise. Next, adjust your Coordinate Positioning and click Open. Smart Points are great for finding window and door placements.
Using the Smart Points export allows you to view the entire point cloud that was created.